


Amateur astronomy can be a rewarding and fascinating hobby. All you really need to explore the universe is a dark sky and a little patience. However, if you want to get a little more serious with astronomy as a hobby, this astronomy equipment guide will help familiarize you with some of the equipment and accessories that are available, including telescopes, telescope mounts, eyepieces, filters, and star charts. This page also covers some of the tools and accessories you may want to consider bringing to your observing sessions to make the experience more comfortable and enjoyable. The information below can help select the right equipment when you are ready to move on to the next level.
 If you are looking to get started with amateur astronomy, binoculars are the ideal instruments for the beginner. Their low cost makes them affordable to almost anyone. Binoculars are available in a variety of sizes and magnifications. Because of their wide field of view, they are also a necessary and popular tool for the experienced astronomer as well. Binocular sizes are expressed with two numbers, such as 7x35 and 10x50. The first number is the power, or magnification. A pair of 7x35 binoculars will magnify the image 7 times. The second number represents the aperture size, or diameter of the objective (front) lenses in millimeters. When selecting binoculars for astronomical viewing, larger apertures are always better. Choose the largest aperture you can afford and comfortably hold on to. Larger apertures will yield brighter images, but they will also be heavier. If the binoculars are a bit too heavy to support for long periods, most can be mounted onto a camera tripod. Make sure you get a pair with a tripod mount. As far as magnification goes, smaller is usually better, believe it or not. Binoculars with high magnifications will be shakier when held in the hands. This can become annoying during an evening of observing. Again, sturdy tripod will help to alleviate this problem. Some astronomy suppliers carry devices that can help stabilize the binoculars by propping them up against your body. Lower magnification will also provide a wider field of view. The best advice for choosing a pair of binoculars is to get what you feel comfortable with. Remember you may want to use them for bird watching or camping as well.
Newtonian Reflector
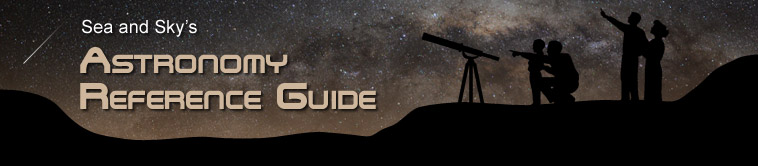
 The reflector telescope (also referred to as a Newtonian after the astronomer Sir Isaac Newton) is the most common type of large-aperture telescope. A reflector focuses light by using mirrors. It is essentially a hollow tube with a large mirror at one end and a smaller mirror at the other end. The smaller mirror reflects the image through an eyepiece located on the side of the tube. Since reflectors do not contain glass lenses, they are lightweight and inexpensive to manufacture. This simple design provides tremendous light-collecting capability at low costs. Reflectors are the least expensive type of telescope per aperture size. They are also quite easy to make. Many amateur astronomers consider making their own telescope as somewhat as a rite of passage. Although they are not as good as refractors for planetary observing, reflectors are ideal for observing faint deep-sky objects such as nebulae and galaxies. The mirrors require frequent alignment for optimal viewing, but can easily be adjusted. Since they have no glass lens on the front of the tube, reflectors are not as susceptible to dew as other telescopes. They can be used on both the equatorial mount as well as the Dobsonian mount. Due to their low cost, Newtonian reflectors are a good choice for someone just starting out in astronomy.
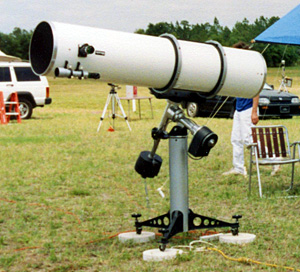
Refractor
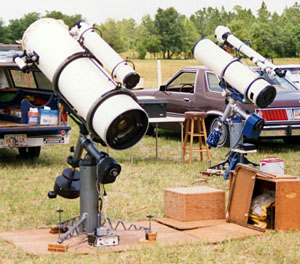
 Refractor telescopes can usually be distinguished by their long, narrow tubes. Unlike reflectors, refracting telescopes use a series of lenses to focus the image. The weight of the glass lenses, in addition to the length of the tube, limits refractors to small apertures. Refractors with apertures larger than 4 inches can be quite expensive and also quite large. These telescopes are almost exclusively used with equatorial mounts. The advantage of the refractor is in its ability to provide a sharp image with a lot of detail. This makes them ideal for lunar and planetary observing and photography. Their small aperture size means they are not quite as well suited for deep-sky observing. For the beginner interested primarily in the planets, they can make a good choice. Due to their design, however, they are much more expensive than their Newtonian reflector counterparts. If you are more interested in galaxies and nebulae, you will probably be better off going with a reflector.
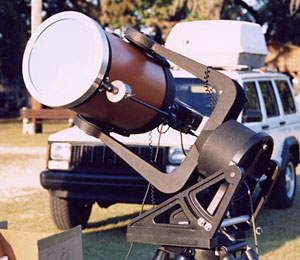
Schmidt-Cassegrain
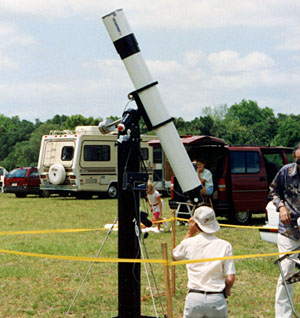
 The Schmidt-Cassegrain is a relatively new design that manages to catch the best of both worlds. It contains elements of both the reflector and the refractor. This design uses two mirrors to bounce the light up and down the tube and then through an opening in the back where the eyepiece is located. The front of the tube contains a glass lens known as the corrector plate. Light enters through the corrector plate where it strikes the primary mirror in the back of the tube. It is then reflected to a small secondary mirror attached to the front corrector plate. From there it is then reflected through a small hole in the back of the primary mirror. Because the light path is essentially folded in half, the tube is much shorter than it would be in a reflector of the same aperture size. Schmidt-Cassegrains have become increasingly popular with amateur astronomers because of their small tube size to aperture ratio. With their motorized fork mounts, these telescopes are ideal for astrophotography. They cost a little more than reflectors, but much less than a refractor of the same aperture size. These telescopes are popular in 8 and 10-inch apertures, and can be found as large as 14 inches. Many of the newer models have built-in computers that can locate objects by entering their coordinates onto a keypad. The Schmidt-Cassegrain is a great all-around performer for both planetary and deep-sky observing.
Equatorial Mount
 The equatorial mount is the most common type of mount available with today's telescopes. It is pretty much standard with both reflectors and refractors. This mount consists of two perpendicular axes. One axis rotates the telescope in Right Ascension (R.A.), and the other controls Declination (Dec.). When the R.A. axis is aligned parallel to the Earth's axis, objects can be tracked by adjusting slow motion controls that move the mount on the R.A. axis. These mounts are available with motors attached to the R.A. axis that enable automatic tracking of objects in the sky. To accomplish this, the mount will rotate the telescope in the opposite direction as the rotation of the Earth. This allows an object to remain centered in the telescope for prolonged periods of time. These mounts also contain coordinate markings called setting circles. These coordinates enable objects to be located by their celestial coordinates using the R.A. and Dec. setting circles.
Fork Mount
 The fork mount is really a modification of the equatorial mount. It is used primarily with Schmidt-Cassegrain telescopes. The fork is designed as a heavy-duty mount that can support a large amount of weight. Telescopes that use these mounts are generally very heavy, due to their large aperture lenses and mirrors. The fork mount allows the telescope to swing between the arms of the fork to adjust the Declination (Dec.) setting. The fork itself rotates on its axis to adjust the Right Ascension (R.A.) settings. Setting circles allow objects to be "dialed-up" according to their coordinates after the mount has been properly aligned with the Earth's axis. Fork mounts usually always contain motors, which allow automatic tracking of objects by correcting for the Earth's rotation. Some of the more advanced fork mounted systems today also contain a computer interface, which allows the telescope to find an object by simply entering its coordinates into a keypad.
Dobsonian Mount
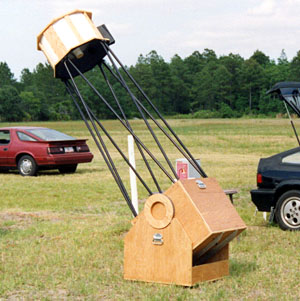 The third type of telescope mount is known as the Dobsonian mount. This is actually a version of the altazimuth mount typically used on camera tripods. It was developed by John Dobson in the 1970s and was designed as a low-cost, easy-to-use mount for large Newtonian telescopes. Dobsonian mounts are generally constructed of wood and sit low to the ground. They are easy to build, which makes them a favorite of the do-it-yourself telescope maker. These mounts are ideal for large telescopes because they are strong and sturdy. They can also be easily moved and adjusted from the eyepiece end (front) of a large Newtonian reflector. The disadvantage of this mount is that it is not possible to track objects as can be done with the equatorial and fork mounts. This makes them unsatisfactory for astrophotography. Dobsonian mounts are typically used by those who observe galaxies and other deep-sky objects with their large Newtonian telescopes.
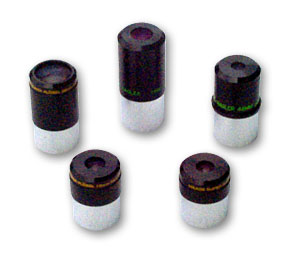 The eyepiece is the part of the telescope that focuses the image to your eye. Eyepieces can also be used to magnify the image up to several hundred times. However, it is important to remember that as you magnify an image, you will lose sharpness, detail, and brightness. Beginners are always tempted to magnify that image of Jupiter or Saturn until it is a large as possible in the field of view. The more experienced observer learns that there is often more detail to be seen in a smaller, brighter image. Magnifying the image also reduces your field of view, basically the area you can see through the eyepiece. When observing large objects such as nebulae or star clusters, a wide field of view is needed. Special wide field eyepieces are also available. These eyepieces can provide a nice, bright image full of details on large objects. Eyepieces are labeled by their focal length, in millimeters. Typical sizes are 25mm, 17mm, 10mm, and so on. To determine the magnification of an eyepiece you simply divide the focal length of the telescope by that of the eyepiece. For example, if the focal length of your telescope were 1000mm, then a 25mm eyepiece would give you a magnification of 40 times. The smaller the focal length rating of the eyepiece, the higher the magnification. Again, it is recommended that beginners start out with a few low-power eyepieces at first. Many people are disappointed at how bad the image actually looks with at high magnifications. Low-power eyepieces also make objects easier to find, due to their wider field of view. Work your way up to higher power after you have a little experience under your belt. A low-cost device useful for gaining additional magnification is the barlow lens. This is a long tube with a lens in it that extends the focal length of the eyepiece and increases the magnification by a factor of 2 or 3. For example, a 2x barlow lens used with our 25mm eyepiece from the example above will increase our magnification from 40x to 80x. The image quality is not quite as good as what you would get with a 12.5mm eyepiece by itself. But adding a barlow lens is an affordable way to effectively double the number of eyepieces in your collection.
Eyepiece Filters
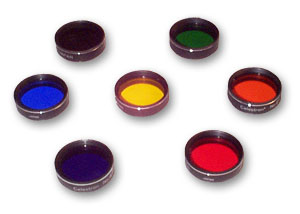 Several different types of filters are available for use with telescope eyepieces. These filters generally work by blocking wavelengths of light that may be interfering with the object you are trying to view. Light pollution filters work by blocking the scattered light from mercury vapor lights and other terrestrial light sources. Colored filters can both block unwanted wavelengths of light and enhance details in an object. For example, observing the planet Mars through a red filter will increase the contrast of the image and make surface details easier to see. A yellow or blue filter will make the Martian polar ice caps more visible. Observing the planet Jupiter through a yellow, blue, or green filter will enhance the details in the cloud bands and make the famous red spot easier to see. These filters are not very expensive. You may want to consider investing in a set of 4 to 6 assorted color filters when your budget can handle it. If you do your observing from areas that are plagued by light pollution, you may want to get yourself a good light pollution filter as well.
Solar Filters
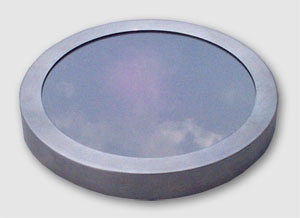 Solar filters are specially designed to allow safe viewing of the Sun. They are typically available in two different styles. The first style is the eyepiece filter. These filters fit directly onto the eyepiece and are typically included with some low-priced telescopes. Because of the intense amount of heat that can build up at the point of focus, these filters are considered to be quite unsafe. They can crack, allowing a sudden rush of light and searing heat into the eye. Eyepiece solar filters should be avoided at all cost! The second style of solar filter is known as the full-aperture filter. These filters fit directly over the aperture of the telescope. Since they block the light at the point where the light initially enters the telescope, they are much safer if used correctly. Full-aperture filters are available in two types. The first type is the optical glass filter. These filters are made from darkened glass that blocks almost all of the light from the Sun. The image rendered by these filters is generally very good. They deliver a natural yellow-orange look to the Sun and provide a comfortable and safe viewing experience. These filters can become quite expensive, however. For large apertures of 6 inches or more, the cost of the filter can easily exceed a hundred dollars. The second type of full-aperture solar filter is the mylar filter. As the name implies, mylar filters are made of reflective sheets of mylar. The advantage of these filters is their low cost. Mylar filters can be obtained for about one third the cost of their optical glass cousins. The disadvantage of mylar filters is that they render an unnatural blue or green image to the Sun. If you are planning on observing and photographing the Sun, purchase the best filter your budget can afford.
IMPORTANT: never look directly at the Sun without the use an approved solar filter. Sunlight through a telescope can severely burn your eyes and cause permanent blindness if an approved solar filter is not used.
Star Charts
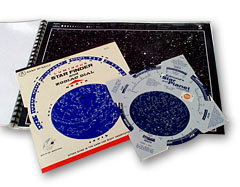 You wouldn't go on a road trip without a street map. Likewise, it is much easier to find your way around the night sky if you carry a set of star charts in some form or other. There are two main types of star charts. Planispheres, sometimes called star finders or star and planet locators, have a round center that allows you to dial in your local date and time in order to display a correct view of the evening sky. They usually only show the constellations and brighter stars in the sky. Static star charts are much more detailed and will list thousands of stars as well as deep sky objects according to their coordinates in the sky. Both types can be obtained from astronomy suppliers and online retailers. Planispheres can also be found at many bookstores and hobby shops.
Flashlights
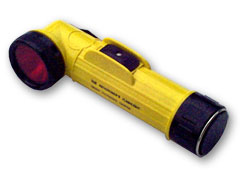 Getting around in the dark can be difficult at best. But you won't be very popular around your peers if you go shining bright lights in their eyes. Fortunately there is a solution. A flashlight with a red lens will allow you to find your way around without ruining your night vision. It takes the average person between 15 and 20 minutes for their vision to fully adapt to the low levels of light. A bright light can send you back to the starting point. All astronomy supply companies offer a number of styles and designs. Many are waterproof, which will help extend the life of your flashlight on those moist, dewy evenings when the humidity is high.
Carrying Cases
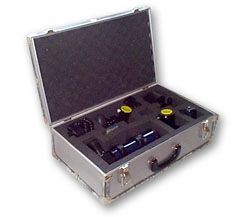 Carrying cases are a must for keeping your equipment organized and free of dirt and moisture. Many types of cases for your equipment can be obtained from a number of sources. Camera shops usually carry plastic cases that have die-cut foam inside that can be cut and rearranged to fit your equipment. Most astronomy supply companies also offer cases and carrying bags that are more specially tailored. At many department stores you can find canvas camera bags with adjustable dividers inside. Shop around and find what works best for you.
Batteries
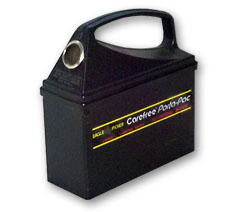 If will be are using a telescope with an electronic mount, or any other type of electric equipment, you are going to need a power source. Many people tend to use their car batteries. While this will work for short periods of time, depending on your power needs, a better solution is to purchase a separate rechargeable battery or battery pack. Sporting goods stores and astronomy suppliers offer a variety of batteries to suit all of your power needs. Another option to consider would be a gas generator. while this will work, it is not recommended if you will be observing with other people. The noise and fumes from a generator are not likely to make you any friends.
Insect Repellant
 This could very well be the most important single piece of equipment in your arsenal. In many parts of the country, these voracious blood-sucking insects descend on unwary astronomers as soon as evening sets in. Many people I know have achieved good results with the skin-so-soft formulas. There are also a great deal of new sprays, candles, and electronic devices to combat these obsessive pests. You will have to find out what works best for you. But make sure you have something. A swarm of mosquitoes can ruin an otherwise excellent night of observing the heavens.
Good Music
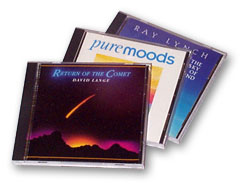 Observing should be a relaxing experience. Be sure to bring along some good music to help the minutes click by. If you are making long exposure photographs through your telescope, you could be sitting at the eyepiece for up to an hour for each photo. Music definitely helps to make the experience a little more enjoyable. Many astronomers seem to enjoy the spacey or celestial sounding music to enhance the observing experience. You can find a lot of these tunes in the New Age sections of most music stores as well online and in some nature stores in the malls. Music by Ray Lynch and David Lange are among my favorites. Be sure to be courteous to others around you. If you are observing with a group, make sure everyone shares your taste in tunes. Otherwise a good pair of earphones may be a wise investment.
Warm Clothing
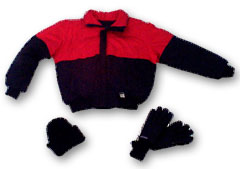 Although a lot of people don't realize it, the temperature can drop quite rapidly in the evenings after the Sun goes down. This is especially true on clear nights when there are no clouds in the sky to hold in the heat. Unfortunately these are the ideal nights when we want to be out under the stars. You may be surprised to find out how chilly it can get after midnight on a summer night. Be sure to bring extra clothing such as jackets, sweat shirts, and sweat pants and be prepared for any changes. During the winter months, be especially careful not to get too cold. Hypothermia can get you when you least expect it. Be sure to dress in layers of warm clothing to keep your body heat in and keep the cold air out. Another reason to keep a jacket with you is for the humidity. Dew can begin to form in the early hours of the morning and you don't want it to form on you.
Food and Drink
 Since dark sky observing sites take most of us quite a way from home, you may want to be sure to remember to bring along some food and drinks. If you are out on an all-night observing session, as are those in many astronomy clubs, this is especially important. Water is necessary to keep your body from becoming dehydrated in the dry, cool night air. Iced tea or cola is particularly helpful for beating those sleepy urges. Snacks are also a must for satisfying those late-night hunger pangs that are inevitable when ever you stay up late past bed time.
Glossary of Terms | Astronomy FAQ | Messier Catalog | Astronomical Calendar
Events & Star Parties | Clubs & Organizations | Equipment Guide | Astronomy Software
Astrophoto Gallery | Astronomy Suppliers | Astronomy Resources | My Sky